Replacing the LED light in your wine cooler is a straightforward DIY task that can restore illumination and save on service costs. This process typically takes about 30-60 minutes and requires basic tools like screwdrivers and needle-nose pliers. Modern wine coolers use LEDs because they emit minimal heat and UV radiation, crucial for preserving wine quality and flavor.
Understanding Your Wine Cooler’s LED Lighting
Modern wine coolers predominantly feature LED (Light Emitting Diode) lighting due to its numerous advantages for wine preservation. Unlike traditional incandescent bulbs, LEDs emit very little heat, which is crucial for maintaining a consistent internal temperature and preventing premature aging of your wine. LEDs produce minimal to no ultraviolet (UV) radiation, a harmful element that can degrade the complex compounds responsible for a wine’s delicate flavors and aromas. Their energy efficiency also means lower operating costs and a longer lifespan, reducing the frequency of replacements.
LED lighting in wine coolers can take several forms, ranging from individual LED bulbs, often found in older or more basic models, to integrated LED strips or light boards. These strips are typically positioned along the sides, top, or behind the control panel, providing even illumination throughout the cabinet. Understanding the type of LED setup in your specific wine cooler is the first step toward a successful replacement. For shop curated home wine on this site.
When to Consider Replacing Your Wine Cooler’s LED Light
Knowing when to replace your wine cooler’s LED light is key. While LEDs are known for their longevity, they aren’t immune to failure. The most obvious sign is when the light simply doesn’t turn on. However, other indicators suggest it’s time for a replacement. You might notice your lights flickering intermittently, indicating a loose connection or a failing component within the LED unit. A gradual dimming of the light over time can also signal that the LEDs are reaching the end of their operational life. If the light color has noticeably changed or appears inconsistent, it could point to an issue with the LED panel itself. Addressing these signs early ensures your wine collection remains beautifully lit and easily accessible.
Tools and Replacement Parts You’ll Need
Before you begin, gather the necessary tools and the correct replacement part. Having everything on hand will make the process smoother and more efficient.
You will typically need:
- Phillips head screwdriver: For removing screws that secure covers or panels.
- Flathead screwdriver or plastic pry tool: Useful for gently prying open light shields or panels without causing damage. A putty knife can also work.
- Needle-nose pliers: Handy for unplugging small electrical connectors.
- Replacement LED light: This is the most crucial item. Always purchase a direct replacement part specifically designed for your wine cooler’s make and model. Consult your owner’s manual or the manufacturer’s website for part numbers. The replacement might be an LED bulb, a light strip, or an entire light board assembly.
- Owner’s Manual: Your wine cooler’s manual is an invaluable resource, often containing specific diagrams and instructions for accessing and replacing internal components.
- Safety gloves: To protect your hands during the process.
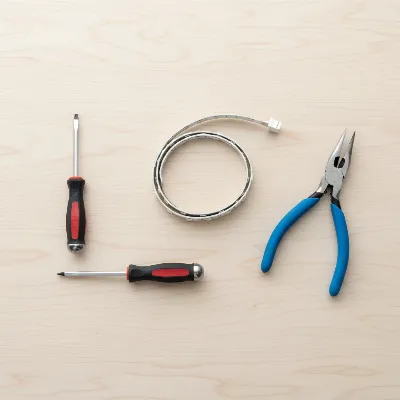 Essential tools for DIY wine cooler LED light replacement including screwdrivers, pliers, and a new light strip.
Step-by-Step DIY Guide to Replacing Your Wine Cooler’s LED Light
Replacing your wine cooler’s LED light requires a methodical approach. Specific steps can vary significantly between models, so always refer to your owner’s manual for precise guidance.
Safety First: Disconnecting Power
|
Our Picks for the Best Wine Cooler in 2026
As an Amazon Associate I earn from qualifying purchases.
|
||
| Num | Product | Action |
|---|---|---|
| 1 | Ivation Premium 6 Bottle Horizontal Thermoelectric Wine Cooler/Chiller Counter Top Red & White Wine Cellar w/Digital Temperature, Freestanding Refrigerator Quiet Operation Fridge |

|
| 2 | Cuisinart CWC-800CEN 8-Bottle Private Reserve Wine Cellar |
|
| 3 | Ivation 12 Bottle Compressor Wine Cooler Refrigerator w/Lock, Large Freestanding Wine Cellar Fridge, 41f-64f Digital Temperature Control Glass Door Black |
|
| 4 | Wine Enthusiast 32-Bottle Dual Zone MAX Compressor Wine Cooler – Freestanding Mini Fridge with Digital Touchscreen, LED Display, Split Storage for Red & White Wines, Matte Black Refrigerator Home Bar |
|
| 5 | BLACK+DECKER Wine Cooler 8 Bottle,Wine Fridge Thermoelectric with Mirrored Front,Freestanding Wine Cooler Refrigerator &LED Display,BD60326 |
|
| 6 | BLACK+DECKER Wine Fridge 12 Bottles, Thermoelectric Wine Cooler Refrigerator with Mirrored Front, Freestanding 12 Bottle Wine Fridge, BD60336 |
|
| 7 | Ivation 12 Bottle Red And White Wine Thermoelectric Wine Cooler/Chiller Counter Top Wine Cellar with Digital Temperature Display, Freestanding Refrigerator Smoked Glass Door Quiet Operation Fridge |
|
| 8 | Wine Enthusiast 6-Bottle Countertop Wine Cooler – Compact Mini Fridge for Kitchen or Bedroom with 3 Shelves, Energy-Efficient Cooling, Adjustable Digital Temperature Control |
|
| 9 | Ivation Premium Stainless Steel 8 Bottle Horizontal Thermoelectric Wine Cooler/Chiller Counter Top Red & White Wine Cellar w/Digital Temperature, Freestanding Refrigerator Quiet Operation Fridge |
|
| 10 | BLACK+DECKER BD60026 Wine Cellar with LED Display (8-Bottle Capacity) |
|
This is the most critical step. Before you touch anything inside your wine cooler, always unplug it from the wall outlet. This eliminates any risk of electrical shock. If your wine cooler is hardwired, locate the circuit breaker that controls the unit and switch it to the “off” position. Double-check that the unit is completely powered down before proceeding.
Accessing the Light Assembly
Next, you’ll need to gain access to the faulty LED light. This typically involves removing any obstructions and then the light cover or panel.
- Empty the cooler: Remove all wine bottles and shelving to provide clear access to the interior. This also prevents accidental breakage.
- Locate the light: The LED light is usually located at the top, along the sides, or sometimes integrated into the control panel assembly.
- Remove the light shield or panel:
- For simple bulb replacements: If your model uses a traditional LED bulb protected by a shield, look for small screws (often Phillips head) securing the shield. Remove these screws and gently pull or pry the shield off.
- For LED strips/boards: These are often covered by a plastic housing or integrated into a larger control panel assembly. You may need to remove screws securing this housing or even detach portions of the control panel. Some models might require removing additional internal components, such as rack slide rails, to fully access the light bar assembly. Use a flathead screwdriver or putty knife carefully to detach any snap-on covers or lenses, being mindful of delicate tabs.
Detaching the Old LED Light
Once the light assembly is exposed, you can remove the old LED unit.
- Disconnect wiring: Using needle-nose pliers, carefully disconnect the wire connector attached to the LED light. These are often small, delicate plugs. Avoid pulling directly on the wires themselves; always grasp the connector.
- Remove mounting hardware: The LED light strip or board might be held in place by small screws, clips, or adhesive strips. Remove any screws, unclip the unit, or gently peel off the adhesive backing. If the light lens tabs break during removal, note this, as you might need a small amount of silicone during reassembly to secure the new lens.
Installing the New LED Light
With the old unit out, it’s time to install the replacement.
- Connect the new light: Plug the wire connector from the wine cooler’s wiring harness into the corresponding port on the new LED light. Ensure it clicks securely into place.
- Secure the new light:
- For bulbs: Screw in the new LED bulb, ensuring it’s snug but not overtightened.
- For strips/boards: Align the new LED light strip or board with its mounting position. If it uses screws, reinsert and tighten them. If it uses adhesive, peel off the backing and firmly press the light into place, ensuring good contact.
- Reattach the light shield/lens: Carefully snap or screw the light shield or lens back into its position. If tabs were broken during removal, a small dab of silicone adhesive can help secure the lens.
Reassembling and Testing
The final steps involve putting everything back together and checking your work.
- Reinstall components: Replace any control panel components, rack slide rails, or plastic housings you removed, ensuring all screws are tightened.
- Replace shelves and bottles: Carefully put the wine shelves and your wine bottles back into the cooler.
- Reconnect power: Plug your wine cooler back into the electrical outlet or switch its circuit breaker back on.
- Test the light: Open the wine cooler door to verify that the new LED light is functioning correctly and illuminating your collection beautifully.
Troubleshooting Common Lighting Issues
If your new LED light isn’t working, or if you’re experiencing ongoing issues, a few troubleshooting steps can help. First, double-check all connections to ensure they are secure and properly seated. A loose plug is a common culprit. Next, inspect the light switch itself; sometimes, the door switch that activates the light can become faulty. You can often test this by gently pressing and releasing the switch while the door is open. Also, verify that the circuit breaker hasn’t tripped, although this is more likely to affect the entire unit than just the light. Finally, visually inspect the wiring for any signs of damage, such as nicks or pinches, which could interrupt the circuit.
When to Call a Professional
While many LED light replacements are manageable for a DIY enthusiast, there are situations where professional assistance is recommended. If your wine cooler’s LED lighting is deeply integrated into the main control board, and accessing it requires extensive disassembly that you’re uncomfortable with, it’s best to call a qualified technician. Similarly, if troubleshooting basic connections and ensuring proper installation doesn’t resolve the issue, it could indicate a more complex electrical problem within the cooler that requires expert diagnosis. Some manufacturers, like Sub-Zero, even explicitly recommend contacting factory-certified service for light replacements to ensure specialized handling and maintain warranty validity. Prioritizing safety and the longevity of your appliance is always wise.
Conclusion
Replacing the LED light in your wine cooler can significantly enhance the visibility and aesthetic appeal of your cherished wine collection. By carefully following the step-by-step instructions, prioritizing safety, and ensuring you have the correct replacement parts, you can successfully complete this DIY repair. From disconnecting the power to testing the new light, each stage is designed to be accessible for the home technician. Don’t let a dim light detract from your wine experience; with a little effort, your wine cooler can once again brilliantly showcase your bottles. What other DIY projects have you considered for your home appliances?
Frequently Asked Questions
Can I use any LED strip as a replacement in my wine cooler?
No, it is crucial to use a replacement LED light specifically designed for your wine cooler’s make and model. Universal LED strips may not have the correct voltage, connectors, or physical dimensions, and could potentially damage your appliance or not function properly. Always refer to your owner’s manual for compatible parts.
How long do wine cooler LED lights typically last?
LED lights are known for their extended lifespan, often lasting tens of thousands of hours, which translates to many years of use. However, factors like continuous operation, power fluctuations, or internal component failures within the wine cooler can sometimes shorten their life.
What if my wine cooler light switch is faulty?
If you suspect the door light switch is the problem, you can test it by gently pressing it to ensure it moves freely and makes proper contact. A faulty switch might require replacement, which can sometimes be a simple swap-out, but often involves accessing internal wiring. Consult your manual or a technician if the switch needs replacing.
Frequently Asked Questions
Can I use any LED strip as a replacement in my wine cooler?
No, it is crucial to use a replacement LED light specifically designed for your wine cooler's make and model. Universal LED strips may not have the correct voltage, connectors, or physical dimensions, and could potentially damage your appliance or not function properly. Always refer to your owner's manual for compatible parts.
How long do wine cooler LED lights typically last?
LED lights are known for their extended lifespan, often lasting tens of thousands of hours, which translates to many years of use. However, factors like continuous operation, power fluctuations, or internal component failures within the wine cooler can sometimes shorten their life.
What if my wine cooler light switch is faulty?
If you suspect the door light switch is the problem, you can test it by gently pressing it to ensure it moves freely and makes proper contact. A faulty switch might require replacement, which can sometimes be a simple swap-out, but often involves accessing internal wiring. Consult your manual or a technician if the switch needs replacing.
What tools are needed to replace a wine cooler LED light?
You will typically need a Phillips head screwdriver, a flathead screwdriver or plastic pry tool, needle-nose pliers, and safety gloves. The most crucial item is the correct replacement LED light specifically designed for your wine cooler's make and model.
When should I call a professional for LED light replacement?
If the LED lighting is deeply integrated into the main control board, requiring extensive disassembly, or if basic troubleshooting doesn't resolve the issue, it's best to call a qualified technician. Some manufacturers, like Sub-Zero, recommend professional service to maintain warranty validity.
Replace Your Wine Cooler's LED Light
Follow these steps to safely and effectively replace the LED light in your wine cooler, restoring its illumination and functionality.
Before starting any work, unplug your wine cooler from the wall outlet to eliminate the risk of electrical shock. If hardwired, switch off the corresponding circuit breaker. Ensure the unit is completely powered down.
Empty the cooler of bottles and shelves for clear access. Locate the LED light, typically at the top, sides, or control panel. Carefully remove any light shields, plastic housings, or control panel components using screwdrivers or a pry tool, being mindful of delicate tabs.
Using needle-nose pliers, disconnect the old LED light's wire connector. Remove any screws, clips, or adhesive securing the old unit. Connect the new LED light's wire connector securely and then mount the new light in place using screws or adhesive. Reattach the light shield or lens.
Reinstall any removed components like control panel parts or rack slide rails. Carefully place shelves and wine bottles back into the cooler. Finally, reconnect power by plugging the cooler back in or switching on the circuit breaker. Open the door to test the new LED light's functionality.
Get our weekly buyer guide
Practical specs, not advice. Unsubscribe anytime.
This guide was super helpful. I appreciated the mention of how important it is for LEDs to emit minimal heat and UV radiation for wine preservation. It made me feel more confident about doing the replacement myself, knowing I wasn’t jeopardizing my collection. My only minor gripe is that finding the exact replacement part took a little longer than expected.
Fantastic guide! I’ve been meaning to fix the dim light in my wine cooler for ages. Understanding that modern coolers use LEDs to prevent premature aging of wine really motivated me to get it done. The process was straightforward, and I’m thrilled with the result. My wine collection looks great and is well-preserved.
I tried replacing the light in my older model wine cooler using the instructions, and while it was mostly clear, I had a bit of trouble with the needle-nose pliers part. My hands are pretty big, so getting into the tight space was a challenge. The light works now, but it took me closer to an hour and a half, not 30-60 minutes.
I was so worried about replacing the LED light in my wine cooler, thinking it would be a huge hassle or I’d break something. But following the steps, it was surprisingly easy! It really did only take me about 45 minutes, and now my wines are beautifully lit again without any heat issues. Definitely saved me a service call.